Introduction: A Large Home-Built Solar Hot Water System in Iowa
by Thom Krystofiak
This section is a narrative introduction. The other sections
on the menu on the left have dozens of photos and endless details.
Inception
What made me decide to pursue the crazy idea of building my own super-sized solar hot water system from scratch in the spring of 2010? I guess the last straw was a talk with a local solar expert who warned me in a knowing, parental way that building my own system would be a "gigantic mistake." "
Oh yeah?" said my rebellious and confident inner child, and I never looked back. Here s how it all unfolded.
My wife works in the Sustainable Living department at Maharishi University of Management, promoting all things green. She yearned for us to walk the talk more than we had been doing. In early 2010 I was finally ready to fulfill one of her long-standing desires by buying a solar hot water system.
The price tag was surprising — about $7000 installed for a system that could handle our modest domestic hot water (DHW) needs. With tax credits, the net cost would be about $5500 (* in 2012, when Iowa added a tax break, the net could have dropped to $4000).
But then I came across a goldmine online:
builditsolar.com, run by Gary Reysa, with endless streams of free information (all of Gary s information is free) on building one s own solar systems. I determined that for less money than the simple commercial system I had been looking at I could build a hot water system with
three times the collection and storage capacity. Because we heat with hot water and radiant floors, I liked the idea of extra capacity. I wanted to see how much of the sun s energy we could harness for winter heating, in addition to our DHW. It would take a system much larger than what I could afford to really "heat the house," but I was hoping for a decent contribution. (As of this writing, the total outlay for this system, including a hired helper now and then, is about $6,000. A commercial system of this size, with interconnects to the radiant heating system, would cost upwards of $16,000 after tax breaks. So I am looking at a ballpark upfront cash savings of $10,000. My labor, of course, is "free".) [* in 2012, when Iowa added a tax break, the net cost could have dropped to about $12,000, making my savings something more like $6,000 at that point.]
Design
Before long I had sketched out a design for a system which — while it owed a lot to systems built by other people — was different in some details from anything I had seen. People often ask me — did you buy a set of plans? There are no actual plans on Gary s site, just descriptions of various designs, with photos illustrating the construction and installation process. I am familiar enough with basic construction techniques that I was sure I could fill in the blanks.
I also relied on a kind of crowd-sourcing. There is an active community of people engaged in do-it-yourself solar energy, and after joining a couple of Yahoo Groups (SimplySolar and SolarHeat) I learned a lot from other experimenters, some of them remarkably generous with their time. It was amazing to be working with other experienced solar experimenters and professionals, none of whom I had ever met, from all over the country, providing the kind of detailed feedback about these home-built systems that I could not get locally.
Things started slowly as I thought through the challenges and drew up the plans, but suddenly the project got goosed. My wife suggested that I might get a student intern or two at the university to help (the good news). But the course was starting in just two weeks (the bad news). So I pushed harder, and soon I was hauling copper pipe, aluminum sheets and plywood to the university shop and we were under way.
Construction
Sherry Bolden, an adventurous thirty-something Sustainable Living student signed up to help. Amazingly, she had experience soldering copper pipe, and in the end we did not have a single leak in well over 100 soldered connections in the arrays. I was working fulltime, and she was in class most of the day, but we managed to spend an hour or two together most afternoons in the shop as we gradually built six 4 ft by 8 ft solar collector panels. We got our aerobics in, hammering grooves into 120 aluminum sheets to fit tightly over the copper pipes. We cut and caulked and routed and stapled and screwed, and in the end decided that six panels were just about enough.
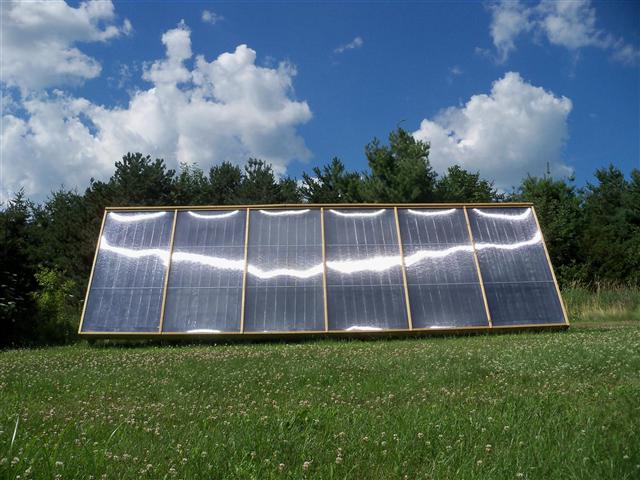
Now the front shifted to our backyard. Figuring that a system built by amateurs should be easily accessible for "adjustments", I did not want it mounted on the roof (lucky thing, as I would have worn out the ladder by now). With cardboard gauges and string I did a solar site survey to determine the best year-round sunny spot in the yard. A farmer friend came by to drill 14 deep holes. Pressure treated posts were set in concrete and the support structure constructed. Foam insulation sheets recycled from a commercial roof came next, and the six collector panels were then popped into place and joined with silicone hose and clamps. A trip to Dyersville (Farmtek, on Field of Dreams Way) supplied the twinwall greenhouse glazing panels, and pretty soon I had a great-looking wood-trimmed 24 ft by 8 ft solar sculpture gracing the backyard.
But I still had to get the heat into the house. Mine is a "drainback" system, which is designed so that the water in the collector will drain back into the storage tank by gravity whenever the pump is off. In climates like Iowa s, you either have to pump glycol through the collector or ensure that no water remains outside when temperatures fall below freezing. The collector sits a couple of feet higher than the grade around the house, and this made the trench to the basement less deep. Still, digging a 50 foot trench on a raging Iowa summer day left my construction helper Chris Haggard and me more or less delirious. At the end of that day I wrote on the back of the collector the wrong information about the piping to the house — reversing which was the supply and which was the return — a glitch that cost me and my online collaborators at least a week of serious head-scratching when I turned the system on. I felt as sheepish in the end as someone who repeatedly calls computer support and then admits, on the fourth call, that the thing was actually never plugged in.
Drilling through the concrete foundation a couple of feet below grade was easier than I imagined with the right rented tool, and fun in a macho kind of way. Inside, I had built a strong rectangular tank out of plywood and 2x4 s, lined with heavy pond liner (EPDM) and insulated with 4" of foam, holding about 300 gallons. The idea of a tank made out of plywood seemed suspicious at first, but it turns out it s a solid and inexpensive solution. Inside the tank are two concentric coils of pipe. The larger coil holds enough pre-heated water in the pipe itself to handle even one of my wife s longest showers, so cold city water never hits our propane water heater (at least Spring through Fall - in Winter I may be drawing a lot of BTUs into the radiant floor). The inner coil is copper for faster heat transfer, and will pre-heat the radiant floor system. Wrassling the recalcitrant pipe into tight coils was a sweaty and hilarious workout, with Sherry and I playing a kind of Twister as I bent and tightened and she held and resisted.
After wiring the controller (which turns the pump on only when there is heat to be harvested) and plumbing the tank to our backup water heater, it was time to throw the switch. Over the next days, my 300 gallons of cold city water rose to 140 degrees, and we were in business.
Challenges
But there were indications that all was not well — the return line was sputtering noisily, and the return water was not as hot as expected for such a large collector. See the page
Lessons Learned for the latest on the challenges of "optimizing the collector". It all worked out in the end.
Bottom Line
It's too early, as I write this in early October 2010, for a "bottom line" on just how well this system works, or how much it will produce. The system produced a good amount of heat the first time I turned it on. After the additional work I did to balance the arrays (see
Lessons Learned), I started getting close to the full potential of the collector. On sunny days through the start of November, the system had no problem keeping the tank around 160 degrees — the high limit I had set. Seven months of the year or more, I expect it will supply virtually all the hot water we use for showers, dishwashing, clothes washing and the like. We'll see what unfolds in real winter... As of December 3, most of the heat the tank has to offer is going into the radiant floor system. The remainder pre-heats the domestic hot water as much as it can.
Overall, this project took longer than I expected, and cost more than my optimistic estimate ($6k vs $4k). So it goes with first-time projects. But I enjoyed it, I learned a lot, I got the satisfaction of doing it myself, and most importantly this was a chance to do something hands-on for the good of the environment - and the economics still look like they make very good sense. A "gigantic mistake"? No - so far, a gigantic hoot and a very nice success.
Update: March 2011
The winter of 2010-11 had a very disappointing amount of sun. Weeks would go by with little or no real sunshine. It was rare that I had enough heat in the tank to divert it to radiant heat; the vast majority of days I saved it for domestic hot water.
Update: March 2012
In the winter of 2011-12 we had much more sun than the previous year, and we were able to harvest more heat for the house. Still, we can only rely on the sun a modest amount for house heating in this climate, at least with a house like ours that is not super-insulated and has a lot of glass. There is just not enough sun in the winter. I still don't have accurate figures on cost savings (tracking relative propane use is tougher than tracking electricity use) but we are clearly saving money on our gas bill. Even though our house-heating results have been limited, I'm happy to be drawing on the sun for almost all our domestic hot water and a portion of our home heating. On a cold night, after a day or two of strong sun, if I divert the heat to the radiant floor the tank will go from 140 down to the mid-80's before the sun comes up again. The system is efficient at using the available BTUs. On a very cold night, the boiler may kick in as well if the solar contribution is not keeping up with the demand. The two systems work very smoothly together, and I am pleased about that. The size of the array lets me capture a lot of heat on a single sunny day, and the size of the tank lets me store it - so I'm glad we went this large. Payback? Depends on the cost of LP, but I imagine the system will pay for itself in something between 5 and 10 years. This is well below my most optimistic expectations before I started, but something we are well satisfied with, as our main interest has always been to do the right thing environmentally.
Wind Damage and Design Change
In March 2012 we had some extreme winds. Somehow an edge of one of the twinwall panels had worked its way free of its batten strip, and the wind caught it and tore it from the frame. The twinwall had a couple of cracks and some bends, so I needed to replace it. I happened to be driving to Wisconsin, so I swung by Farmtek in northeast Iowa for a replacement sheet. To avoid the problem of a panel working its way free again, I had decided after the wind damage to widen the wood batten strips (and widen the support below them). But since I was going to Farmtek, I changed my mind and bought aluminum H channel (and U channel for the two ends). These channels provide deep slots to hold the twinwall, with plenty of space to accommodate panel shrinkage in the cold. The aluminum looks good installed. But it was a pain getting my "used" twinwall to slide into those 8 foot long slots and to position everything just so. (The factory new panel I used was a breeze, though.) The use of the channels also means that to remove any given panel, I have to start at an end and remove all panels up to the one I need to work on — pulling the twinwall out of its tight grooves and reinserting it all again when done. In retrospect it might have been better to have gone with my original idea to use wider wood battens, for easier access - though I do not expect to have to get into the panels vey often. See pictures in the
Lessons Learned section.
Presenting at the Iowa Renewable Energy Association Expo in June 2012:
 Next page (Design) >>